Getting started
Download RSLogger, connect your devices and record a first session.
System requirements
The requirements below were read from the version 0.2.16 release files on 2026-09-17.
| Platform | Requirement |
|---|---|
| Windows | Windows 10 or later, 64-bit |
| macOS | macOS 14 (Sonoma) or later on Apple silicon. The build does not run on Intel Macs |
| Linux | x86_64 with glibc 2.38 or newer, for example Ubuntu 24.04 or later. The build does not start on Ubuntu 22.04 or 20.04 |
| Raspberry Pi | Runs from source. Supplied on request, see below |
4 GB of memory is the minimum and 8 GB is better. Record video to an SSD. On a Raspberry Pi, record to a USB SSD rather than the microSD card.
Download and run
There is nothing to install. Download the file for your platform, extract it and run the program. All three downloads are on the products page and on GitHub.
Windows
- Download RSLogger-Windows.zip.
- Extract it. It contains one file,
RSLogger.exe. - Run
RSLogger.exe.
macOS
- Download RSLogger-macOS.zip.
- Extract it. It contains
RSLogger.app. - Open
RSLogger.app. If macOS says it cannot verify the developer, open System Settings, go to Privacy & Security and choose Open Anyway.
Linux
- Download RSLogger-Linux.zip.
- Extract it into a folder of its own. The zip has no top-level folder, so extracting it in place scatters about 150 files into the current directory.
- Run the
loggerexecutable from that folder.
mkdir RSLogger
unzip RSLogger-Linux.zip -d RSLogger
cd RSLogger
./logger
To open the DRT or the occlusion goggles on Linux, your user must be in the dialout group. Log out and back in after adding it.
sudo usermod -aG dialout $USERRaspberry Pi
There is no packaged download for the Raspberry Pi. RSLogger runs there from source, and it is the only platform with the GPS module and CSI camera support. Contact us and we will send the source and the setup steps for your board.
The main window
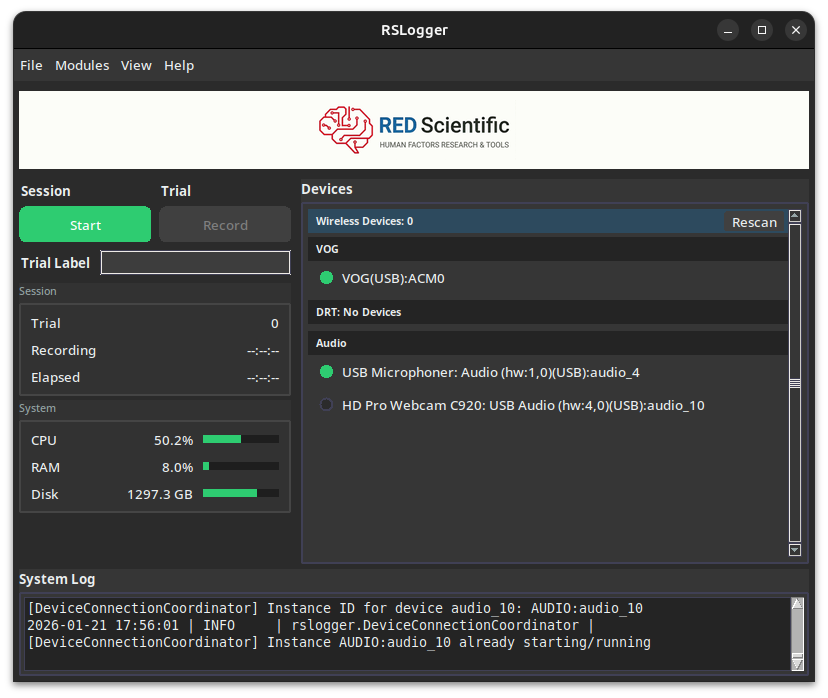
The menu bar has four menus: File, Modules, View and Help. Below it:
- Session has a Start button, which becomes Stop while a session runs.
- Trial has a Record button, which becomes Pause while a trial records, and a Trial Label field.
- Devices lists every device that a running module has detected, with a Rescan button for wireless devices. Click a device to connect it; its indicator turns green when it is ready. Click again to disconnect.
- Two cards show the trial number, the recording and elapsed timers, and CPU, memory and disk use.
- System Log shows messages from RSLogger and the modules.
Help > Quick Start Guide opens a shorter version of this page inside the program.
Enable modules
No module runs until you turn it on. Open the Modules menu and check the ones you need. Each module starts in its own process, opens its own window, and adds the devices it finds to the Devices panel. Uncheck a module to stop it.
Connect devices
| Device | Connection |
|---|---|
| Detection response task, wired | USB. Appears as a serial port and is detected when plugged in |
| Visual occlusion goggles, wired | USB. Appears as a serial port and is detected when plugged in |
| Wireless DRT or goggles | XBee radio. The coordinator plugs into a USB port on the host. Use Rescan in the Devices panel |
| USB microphones | USB. Detected automatically |
| USB webcams | USB. Detected automatically |
| Pupil Labs Neon | WiFi. The Companion phone and the host must share one network that allows them to see each other. See the eye tracker page |
| CSI camera | Ribbon cable to the Raspberry Pi. Power the Pi off before connecting it |
| BerryGPS | UART on the Raspberry Pi GPIO header. See the GPS page |
Record a first session
- Enable the modules you needFrom the Modules menu. Wait until each device shows as connected in the Devices panel.
- Start a sessionClick Start under Session and choose a folder. RSLogger creates a folder named
session_YYYYMMDD_HHMMSSinside it. Every module writes into that folder. - Label the trialOptional. Anything typed in Trial Label is written into the
labelcolumn of every file recorded during the trial. - Record a trialClick Record under Trial. Every enabled module starts recording. The button changes to Pause.
- End the trialClick Pause. Files close and the trial counter advances. Record again for the next trial.
- Stop the sessionClick Stop under Session when you are done.
The session folder contains one subfolder per module and a CONTROL.csv file that records when you pressed each button. A session with a webcam, a microphone, a wired DRT and the notes module looks like this after one trial:
session_20260318_143022/
├── 20260318_143022_CONTROL.csv
├── Cameras/
│   └── usb_1-2.3/
│       ├── 20260318_143022_CAM_trial001_hdprowebcamc920.mp4
│       └── 20260318_143022_CAM_trial001_hdprowebcamc920_timing.csv
├── Audio/
│   ├── 20260318_143022_AUD_trial001_MIC0_usbmicrophone.wav
│   └── 20260318_143022_AUD_trial001_MIC0_usbmicrophone_timing.csv
├── DRT/
│   └── 20260318_143022_DRT_dev_ttyacm0.csv
└── Notes/
  └── 20260318_143022_NTS_trial001_notes.csv
Cameras, audio and notes write one file set per trial. The DRT, the goggles and GPS write one file per device for the whole session, with the trial recorded in each row. Data output lists every file and column.